Need a Roof Rack? No problemo!


Need a Roof Rack? No problemo!
So every once in a while someone wants to haul stuff in their car other than wind/ kitesurf
gear and/or cannot fit the boards/sails/kites inside the Honda Pubic while seating 5 of their family
members or friends. Well, then the argument focuses on the prohibitive cost of the Thule* (*substitute
other overpriced, will inevitably need accessory parts that cost more than the rack to begin with,
imported but actually made in China roof rack company) roof rack etcetera and the person ends
up knitting a new sweater on the next windy day.
Well, no more I say!! Here's one way to get your boards and sail/kite bags out of your car and still not foot
the wicked bills for that designer rack. Or to have to buy a gas guzzling monster truck/ van (like my rigs).
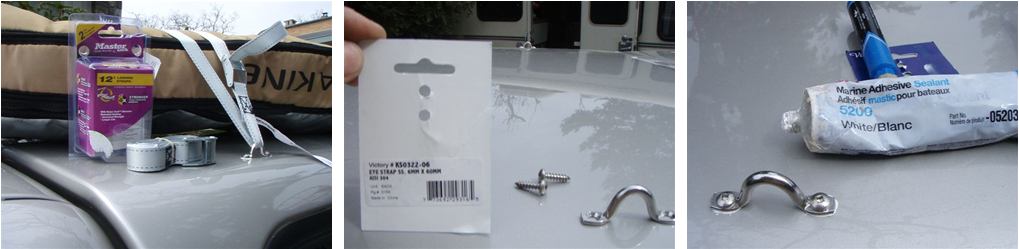
Purchase the following:
- A decent tie down strap set w/ cam lock, at least 1" diameter, ~
10-12' long ea. (8-12 bucks)
- 4-6 tie down, 2 bolthole stainless loops from your local hardware or
marine store (8-12 bucks)
- 8-12 stainless bolts/ locking nuts, self-tapping screws or stainless
screws; these should be course thread if screws and/or minimum #8 bolts/screw diameter (5-8 bucks)
- 5200 Marine Silicone tube (8-12 bucks)..

Grand total $29-44 and half hour's work
(I was able to get all of these items at Bosuns' Locker or Capital Iron in Victoria)
Gather the following:
- Multi driver screwdriver or wrenches to fit the bolt heads
- Cordless drill and bit of the diameter size smaller!! than the
screws/ or same as the bolts
- Tape measure to get things in at least similar distances from edges
of roof etc.
- Marker pen
- A few beers (not too many or nasty things happen to your project)
and some tunes
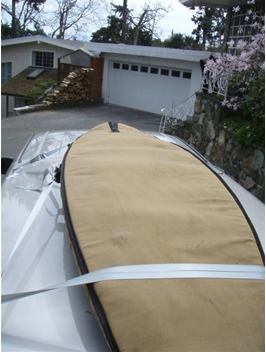
1) Lay your board(s) on the roof to get a sense where the straps should
roughly be anchored and that they will be symmetrical. Some smaller roofs will fit only one, most others usually two boards.
2) Envision the upward or sideways forces of the straps when pulled tight and install the loops at such an angle as to minimize lateral pressure and maximize
upward pressure so the loops won't bend over time or dent the roof. If lateral pressure cannot be avoided, install at a right or oblique angle to reduce the forces.
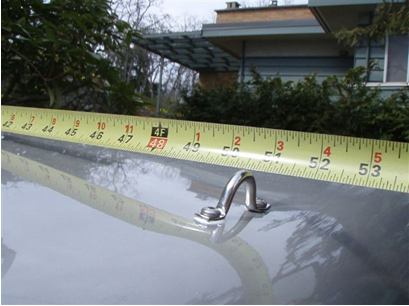
3) Mark roof with marker pen through eyes of the tie down loops once located where you want them
4) Homeowner clue: if you make sure the loops are a minimum of 4'
apart you can also use them to haul plywood, gyproc and other bulky items like ....washing machines.
5) Decide if you can get at the bottom of the holes and then you could
use bolts and nuts which will be bomber but this is not necessary in most cases.
6) To estimate bit size required hold the bit along the screw to see
that the shaft of the screw/bolt is versus the threads.
7) Drill holes, making sure to a) not to go through the liner of the roof if you have a finished metal
roof or if using screws and b) not to overly enlarge the holes, as the screw threads need to grab
something. Holes going into metal should be quite a bit smaller than the screw itself, self tapping or
stainless screws will be hard to start but will then gradually get easier to turn. In fiberglass (ie. Truck canopy)
make the holes only slightly smaller to keep the gelcoat from cracking outward.
If you own a rag top maybe don't try this
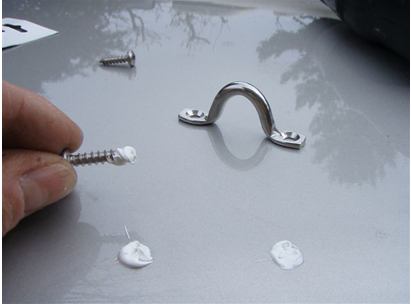
8.) Drop a bit of 5200 into the completed holes and onto the ends of the screws to ensure the holes
and the base of the screw as well as the loop base will be well sealed against the elements.
Make sure you wear your best shirt when doing this so your wife can complain to you about the
white silicone stain on it that will NEVER come out.
9) Install the screws/bolts and tighten. Do not Hulk Hogan things! Snug is all that is needed, stripping screws
means drilling a new set of holes, make no mistake about it..you can't just add more silicone, haha!
....No, really, you can't!! The stuff adds lots of strength on its own, sticks like shit to a blanket
(or your best shirt) but you cannot rely on it to hold the whole load.
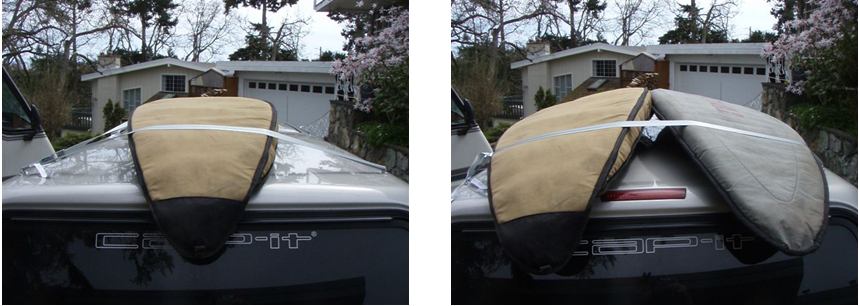
10) Test the rack. Use boardbags on the boards or place a swim noodle
under both ends of the board at the loop locations.
11) Usually two surf boards will want to bind upward due to the forces
and placing a sail/kite bag in the middle will add friction as well as reduce this upward force to make
a nice stable package. An alternative to this is to install a separate third set of loops in the middle
of the roof, in particular if you have a wide roof such as a full-size van.
12) Make sure you try to tie items together, weave the strap through the
board bag handle etc. or add a safety line. I have never had a loop fail
(make sure you buy decent stainless, skookum stuff and don't overly enlarge holes or strip
the screws when installing!!). And I have always replaced straps in time, the sun will rot them in
one year so don't hurt anyone on the roads by trying to save $10!
Viola, now you are a cool beach cruiser! You can be like a mainland surfer and motor around with
yer ride with surf boards on top that never really get removed or used. And your wheels with the loops
still look professional, have minimal crap on the roof and if you used 5200, you will NEVER have a
leak develop...I have done this to 4 different vehicles and have never had a problem,
but trust me, buy the 5200!
Have fun!!
gear and/or cannot fit the boards/sails/kites inside the Honda Pubic while seating 5 of their family
members or friends. Well, then the argument focuses on the prohibitive cost of the Thule* (*substitute
other overpriced, will inevitably need accessory parts that cost more than the rack to begin with,
imported but actually made in China roof rack company) roof rack etcetera and the person ends
up knitting a new sweater on the next windy day.
Well, no more I say!! Here's one way to get your boards and sail/kite bags out of your car and still not foot
the wicked bills for that designer rack. Or to have to buy a gas guzzling monster truck/ van (like my rigs).
Purchase the following:
- A decent tie down strap set w/ cam lock, at least 1" diameter, ~
10-12' long ea. (8-12 bucks)
- 4-6 tie down, 2 bolthole stainless loops from your local hardware or
marine store (8-12 bucks)
- 8-12 stainless bolts/ locking nuts, self-tapping screws or stainless
screws; these should be course thread if screws and/or minimum #8 bolts/screw diameter (5-8 bucks)
- 5200 Marine Silicone tube (8-12 bucks)..
Grand total $29-44 and half hour's work
(I was able to get all of these items at Bosuns' Locker or Capital Iron in Victoria)
Gather the following:
- Multi driver screwdriver or wrenches to fit the bolt heads
- Cordless drill and bit of the diameter size smaller!!
screws/ or same as the bolts
- Tape measure to get things in at least similar distances from edges
of roof etc.
- Marker pen
- A few beers (not too many or nasty things happen to your project)
and some tunes
1) Lay your board(s) on the roof to get a sense where the straps should
roughly be anchored and that they will be symmetrical. Some smaller roofs will fit only one, most others usually two boards.
2) Envision the upward or sideways forces of the straps when pulled tight and install the loops at such an angle as to minimize lateral pressure and maximize
upward pressure so the loops won't bend over time or dent the roof. If lateral pressure cannot be avoided, install at a right or oblique angle to reduce the forces.
3) Mark roof with marker pen through eyes of the tie down loops once located where you want them
4) Homeowner clue: if you make sure the loops are a minimum of 4'
apart you can also use them to haul plywood, gyproc and other bulky items like ....washing machines.
5) Decide if you can get at the bottom of the holes and then you could
use bolts and nuts which will be bomber but this is not necessary in most cases.
6) To estimate bit size required hold the bit along the screw to see
that the shaft of the screw/bolt is versus the threads.
7) Drill holes, making sure to a) not to go through the liner of the roof if you have a finished metal
roof or if using screws and b) not to overly enlarge the holes, as the screw threads need to grab
something. Holes going into metal should be quite a bit smaller than the screw itself, self tapping or
stainless screws will be hard to start but will then gradually get easier to turn. In fiberglass (ie. Truck canopy)
make the holes only slightly smaller to keep the gelcoat from cracking outward.
If you own a rag top maybe don't try this
8.) Drop a bit of 5200 into the completed holes and onto the ends of the screws to ensure the holes
and the base of the screw as well as the loop base will be well sealed against the elements.
Make sure you wear your best shirt when doing this so your wife can complain to you about the
white silicone stain on it that will NEVER come out.
9) Install the screws/bolts and tighten. Do not Hulk Hogan things! Snug is all that is needed, stripping screws
means drilling a new set of holes, make no mistake about it..you can't just add more silicone, haha!
....No, really, you can't!! The stuff adds lots of strength on its own, sticks like shit to a blanket
(or your best shirt) but you cannot rely on it to hold the whole load.
10) Test the rack. Use boardbags on the boards or place a swim noodle
under both ends of the board at the loop locations.
11) Usually two surf boards will want to bind upward due to the forces
and placing a sail/kite bag in the middle will add friction as well as reduce this upward force to make
a nice stable package. An alternative to this is to install a separate third set of loops in the middle
of the roof, in particular if you have a wide roof such as a full-size van.
12) Make sure you try to tie items together, weave the strap through the
board bag handle etc. or add a safety line. I have never had a loop fail
(make sure you buy decent stainless, skookum stuff and don't overly enlarge holes or strip
the screws when installing!!). And I have always replaced straps in time, the sun will rot them in
one year so don't hurt anyone on the roads by trying to save $10!
Viola, now you are a cool beach cruiser! You can be like a mainland surfer and motor around with
yer ride with surf boards on top that never really get removed or used. And your wheels with the loops
still look professional, have minimal crap on the roof and if you used 5200, you will NEVER have a
leak develop...I have done this to 4 different vehicles and have never had a problem,
but trust me, buy the 5200!
Have fun!!
Last edited by KUS on Sun Apr 19, 2009 8:28 pm, edited 6 times in total.
Sweet, I love the simplicity. But it reminds me that I have a piece of 6" PVC that I used to have on my rack for masts. If anyone wants to pimp-out their trailer / moho with a big white bazooka it's free for the taking (comes with brackets, clip-on end cap, and likely a few slugs and spiders).
_______________
is that a whitecap?
is that a whitecap?

Mainlanders
I hope you don't mean mainlander WINDsurfers! Anyways I have a Vanagon so there is always room inside for gear that never gets used ; 0

I put a similar system on top of my old large thule box, but the boards moved side to side too much as the loop eyes were too far apart so there is not enough downward pressure on the boards. So I went to Island Longboards and picked up a set of soft racks, problem solved. With the 2 kayak racks I can get 7 boards on the truck You can still open the box if you don't put too much weight on it.
yes, I describe the option of using bolts and nylon locking nuts or lock washers....and it is of course the preferred method for strength and inspection as you point out.....but you cannot always get at the underside, sometimes due to double layers of metal in the roof or the roof liner. The course thread screws have been plenty strong when inserted into the fairly thick metal parts of the roof. If mounted on the vertical plane (always recommended to have water run off and reduce the lateral load) of the higher portion of the roof supports there is usually more meat in the metal there too and I have installed the loops at an angle to reduce the lateral forces, looks good and works.JL wrote:Why not use bolts & those funky SSnuts with the nylon ? Then you can add deckhead attachments to the inside of your canopy & can check / tighten the connections after the Nitinaht grind !!!
Yep, $1 swimming noodles with the strap pulled through the center hole works as well.....tho we do want to keep our dedicated retailers in businesseastside wrote:I put a similar system on top of my old large thule box, but the boards moved side to side too much as the loop eyes were too far apart so there is not enough downward pressure on the boards. So I went to Island Longboards and picked up a set of soft racks, problem solved. With the 2 kayak racks I can get 7 boards on the truck
Last edited by KUS on Mon Apr 20, 2009 9:27 am, edited 1 time in total.
-
more force 4

- Sponsor
- Posts: 1453
- Joined: Wed Oct 15, 2003 8:57 am
- Location: Victoria, BC
- Has thanked: 21 times
- Been thanked: 4 times
- Contact:

I just went to buy kayak rack pads - they don't make them anymore (not the type with foam covered with fabric/end cord ties/mid velcro) or not at a descent price, so they don't bring them in to the kayak place next to Capital Iron. He suggested Thule (overpriced as Kus noted). I just bought pipe insulation for now, but it really is a poor second best.
If you are worried about a strong pull deforming the roof or pulling sheet metal screws out as you blast down the highway, but can only work from the outside, get some nutserts from Cascade Distributors, Beta St (about the only people in town who carry them). They install rivet-fashion, so you end up with a backplate-type spread of the load behind your body metal, and use a regular eyebolt to engage lots of threads (Kus' favourite sealer still recommended of course). Bomber!
If you are worried about a strong pull deforming the roof or pulling sheet metal screws out as you blast down the highway, but can only work from the outside, get some nutserts from Cascade Distributors, Beta St (about the only people in town who carry them). They install rivet-fashion, so you end up with a backplate-type spread of the load behind your body metal, and use a regular eyebolt to engage lots of threads (Kus' favourite sealer still recommended of course). Bomber!
-
downwind dave

- Website Donor
- Posts: 1468
- Joined: Thu Apr 29, 2004 9:05 am
- Location: cobblehill
- Contact: